This is the “social” era. We’re surrounded by tons of social news and updates everywhere and the only thing that matters is what is shown on our most loved network’s news feed. So no one opens emails anymore, right?
Wrong. Nothing could be further from the truth.
Turns out studies are showing that of all things, email use is on the rise, with 50% of millennials checking their email while still in bed in the morning.
So yeah, email isn’t going anywhere. And if you’re not using email to communicate with your audience you’re probably missing out.
In this post I’m going to show you how you can quickly create a landing page, that will function as a lead capture page too.
So what is a landing page?
In marketing world’s jargon, a landing page is a page that feels separate from your website, and that is designed to fulfill a very specific purpose. In this case, it’ll be a lead capture page: a page we will use to save a visitor’s email address so we can communicate with her later on.
The whole idea behind the “very specific purpose” of a landing page is that it should be so simple to follow that the user sees no distractions whatsoever from the main action we want her to complete.
That’s why you will notice that most landing pages have no header or footer navigation. The experience on that page is focused only on that particular goal. Whatever we want our visitor to do afterwards, has to happen afterwards.
So, to sum things up, we’ll need two main things here to make this happen. First, the ability to hide our site’s navigation. Second, a way of adding a lead capture mechanism to a page.
We’ll explain the procedure to have this lead capture page working super fast on any of our themes so you can have a gorgeous landing page for any of your marketing efforts.
First move: turn the page into a landing page
The first thing we’ll do is disable our page navigation. You will need to be using a modular page template for this.
Then, navigate to the Page Options section, and check the “Hide Page Header” option. This will prevent the page title from appearing on the page.
To disable the header and footer from showing up, look for the “Landing Page Mode” option, and set it to enabled. Easy, right? Now hit Update (or Publish, for a new page) and you’ll be looking at your brand new landing page. Cool.
Second move: add your lead capture box
As I explained earlier, a lead capture box is simply a form in which your users can put their email addresses. In most scenarios nowadays, this happens because they want to get something from you.
So perhaps you’re offering your latest ebook. Or a special cheatsheet you prepared to go along with a blog post.
But it can also be a leadbox to simply subscribe to your newsletter, if you send periodic emails with updates.
Our modular WordPress themes come packed with a new leadbox module that will let you connect both ConvertKit or Mailchimp, two of the most popular email marketing services out there. And not only it’ll let you connect to them. This leadbox module will create the form for you, complete with styling options and averything.
Yes, we love it.
So how should you proceed? Go ahead and create a new module, and then select for this module the Leadbox type. If you’ve been using our themes for at least an hour you’re already an expert (but just in case, here’s how to add this new module to the page we’ll be using).
The first thing we’ll need to pick for this leadbox is the layout we want to use. You’ll find a variety that should fit your ideal design.
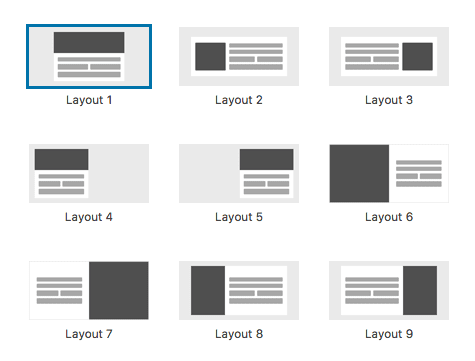
Hint: You can add a different module next to this leadbox by putting this module inside a columns module.
Once we have the layout we want to use, we’re given the option to add some copy. You can enter a title for the form, free content via the editor, and a footer copy line that will show below it.
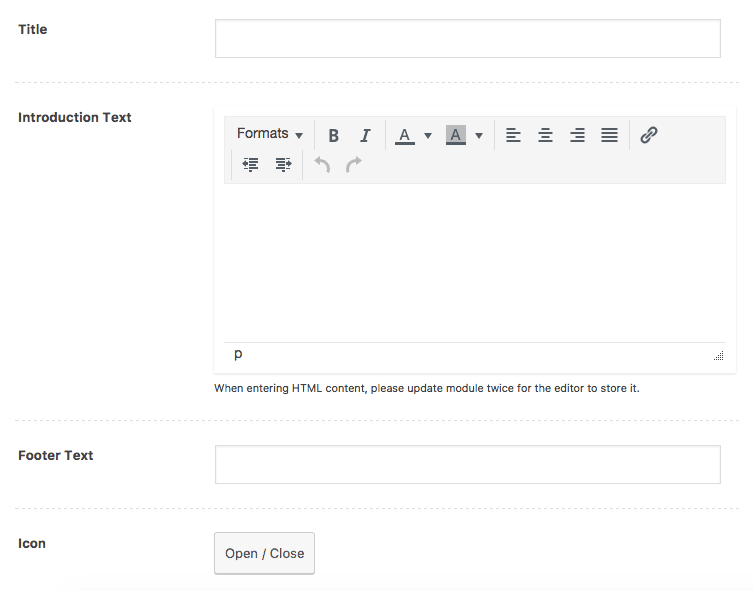
You should use those fields to communicate the value your visitor will get in return of giving you her email address. Giving someone your email address is letting him get in touch.
People can be very reticent to provide their email addresses if they’re unsure about what is going to happen after they enter it. Make it easier on them and clearly state what is in for them.
The icon, image and background options here should aid you in that goal. But even if you don’t use them, you’ll get a sharp looking form.
Then, we get to the form settings. This is where we’ll get to connect our email marketing service account to the leadbox module, so we’ll click on the Manage Email Settings button to get that setup.
Setting Up ConvertKit:
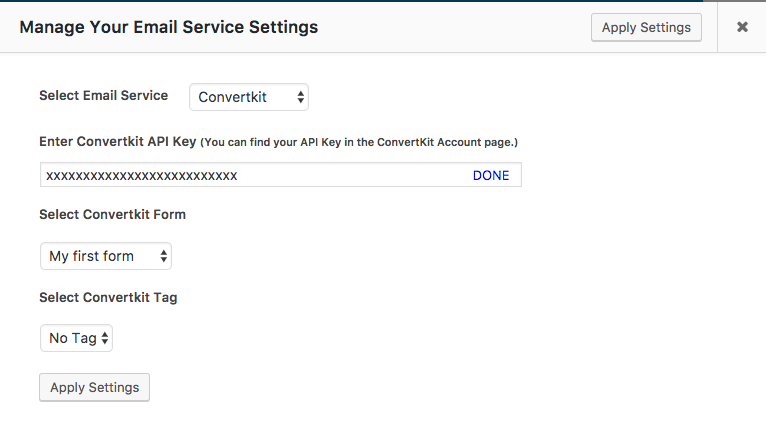
- Select ConvertKit from the Email Service dropdown.
- Enter your ConvertKit API Key (you can find your API Key in the ConvertKit Account page).
- Click on DONE so the system can go and look for your forms and tags.
- Select the form you want the email subscribers to subscribe to (you’ll have to create your forms in ConvertKit first, but there’s no need to style it in there, you can leave that up to the theme).
- Select a tag if you want to add your subscribers a tag, to know where are they coming from, or what are they subscribing to (same as before, you’ll need to enable these tags in ConvertKit first).
- Click on Apply Settings to save your settings and close this lightbox.
Don’t start without a strategy! Get the Website Strategy Questionnaire and make sure you’re building a smart website. Download it here.
Setting Up Mailchimp:
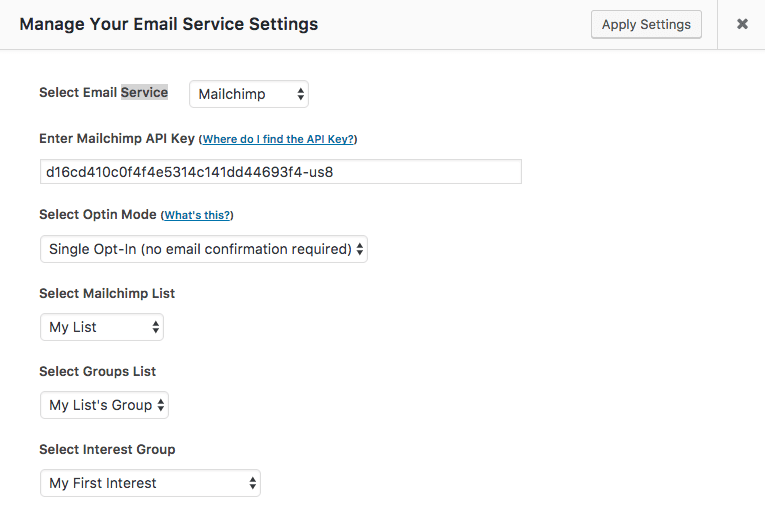
- Select Mailchimp from the Email Service dropdown.
- Enter your Mailchimp API Key (you can find your API Key navigating to Account » Extras » API Keys).
- Click on DONE so the system can go and look for your lists, groups, and interests.
- Choose whether you want your list to have a Single or Double Opt-In. This means, will you want your subscribers to be asked to confirm they submitted their email address once they do? Or will they be subscribed immediately?
- Select the list you want the email subscribers to subscribe to (you’ll have to create your lists in Mailchimp first).
- Pick a Group if you want your subscribers to belong to a particular group inside the list.
- Choose an Interest if you want your subscribers to subscribe to a specific interest inside that group.
- Click on Apply Settings to save your settings and close this lightbox.
Once we got our email provider setup, the leadbox is basically ready to go. But we still have a couple of controls to play with, so we can design the best lead capture experience ever.
Which input fields do we want on our form?
Whether you’ll want to have both their email address and their name, or only their email address it’s up to you and it’ll depend on the experience you’re crafting.
You can select if you want the two fields to show up on the form with the Select inputs included in the form option. And also fill in placeholders for them so that your visitors get it right away and the process is seamless.
What happens after the user clicks the submit button?
The leadbox module lets you define what happens once the email gets sent to your email marketing service with a couple of simple controls.
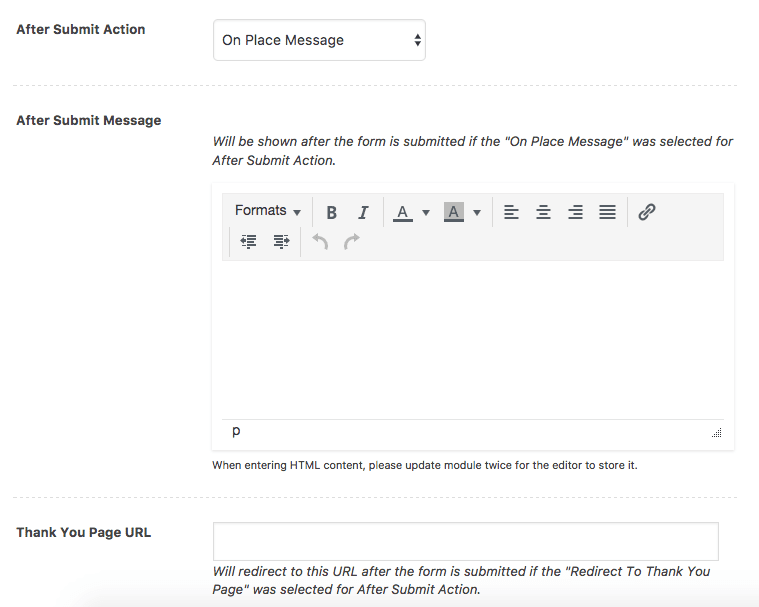
We’ll have to decide if we want the user to be redirected to another page, or if we want to show a message in place of the form.
Normally, if this was a landing page, we’d want the user to keep browsing our site, so choosing the Redirect to Thank You page option would make sense here. You can then insert the URL for your Thank You page, and create a path for your user to go through after she submitted her email address.
But if this leadbox was in the middle of a page, instead, and you know there is still something for her to do on that same page, then going with the On Place Message option will suit you better. And you’ll find an editor in the options to craft the After Submit Message in there.
And this is an example of how this leadbox module could look when we finish…

You can see more exciting examples of this module here.
So there you have it. A lead capture form created with a simple module, super quick, no custom coding needed whatsoever.
Have you created a landing page with this module already?