I’m very happy to tell you that the latest update for the themes shipped with a brand new Swiss Army knife for your toolbox: a Front-End Editor for modules.
Now you can devote your time strictly to the creative process of crafting the perfect page while directly looking at it. Everything you change on the modules options is there to be seen immediately.
We’ve been using it internally for the last two weeks and we’re super excited for what this has added to the creation experience. It’s now faster and even easier than before.
What can you expect to do with the new Artisan Front-End Editor?
- Edit modules already in use on a modular page
- Create and add new modules to a modular page
- Add existing modules to a modular page
- Arrange or remove modules from a modular page
All this without having to go back and forth between the WordPress admin and the front end side of your website (and yes: Page Options are being added to this list very soon).
As always, we want you to be able to focus on what’s important in your website crafting process: to focus on the journey your visitors take when they arrive on your site, section by section and page by page. That means not having to worry about whether a module is going to look fine when you add your content.
Just pick the settings you need for each module, and off you go. Everything done in one same tab of your browser.
How do you access the Front-End Editor?
There are three available ways of accessing the Front-End Editor while using the theme, depending of where are you on the WordPress Dashboard:
1. On the Edit Page Screen: Once you select the Modular Page template for a page and publish it, you will see the Front-End Editor button in blue color. Click on it and you will be in Front-End Editor mode.

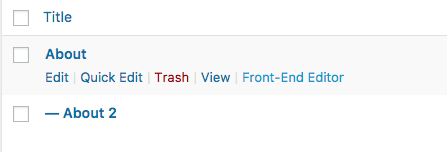
2. On the Pages List Screen: While hovering with the mouse over any modular page (pages that have selected the Modular Page template for them) you will see a new added link for the editor.
3. On the Front-End Toolbar: If you use the WordPress Toolbar while browsing the site you will see a Front-End Editor link on it too. Clicking on it will activate the editing mode and will add a green button next to it to indicate you are editing that page.

Once you are on the Front-End Editor mode, navigating your site through the navigation menu will keep you on the editor mode. You have to manually exit it to stop editing.
How to use the Front-End Editor?
To edit a specific module: Hovering with the mouse over a specific module will enable a colored overlay to indicate there’s a module to edit. You will see a “Edit This Module” button on the top-left corner on the module. Clicking on it will bring up the module controls lightbox.
The Front-End Editor Toolbox
While editing a page you will see a wrench button on the lower-right corner of the screen. Moving the mouse over it will expand a set of tools.
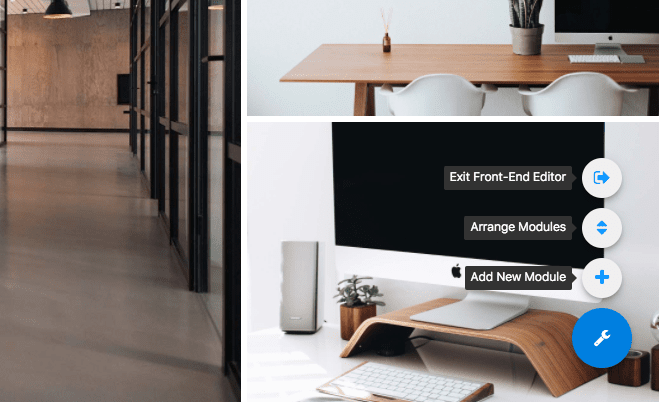
Add New Module: Opens the Module Creation lightbox and lets you create and add new modules to a Modular Page.
Arrange Modules: Opens the arranging lightbox, where you can re-order any modules on the page, remove any modules you don’t want there anymore, and add existing modules to the page that you might have created before (like modules you created for another page, for example).
Exit Front-End Editor: Exits the editor mode and reloads the same page you were editing.
We’re sure you’re gonna have lots of fun working with it. Have any suggestions to make it better? Let us know in the comments.