So you followed the famous 5-minute install and you have WordPress up and running in your brand new website. But, what to do next? What do you need to do before you start creating your content and setting up your theme?
Or let’s say you’re creating a site for a client. The site is ready to be published and start receiving visitors. And just before you deliver the work to your client: what are the things that must be done and checked to make sure your WordPress site is secure, optimized and all the little details are adjusted?
Here’s a checklist of things you should do on every fresh WordPress install. A start-up guide to take control over your WordPress site.
General
1. Set Up Your Site Title & Tagline
The title and the tagline are one of the essential elements that identify your website, and tell people and search engines what your website is about. You’ll find them under Settings » General, in your WP dashboard.
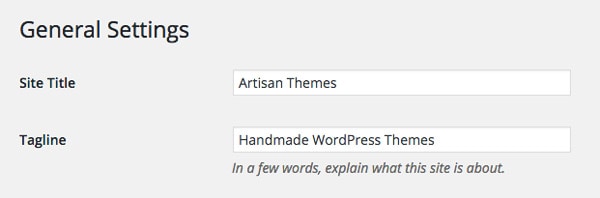
The Site Title works as the name of your website. It’ll appear in the title bar of the browser and is usually (depends on the theme) displayed in your site’s header. It will also appear in different places such as:
- The admin bar at your WP dashboard (linking to your site’s homepage).
- The sender’s name when your followers receive email notifications.
The Site Title doesn’t need to be the same as your site URL. Try to keep it short and solid.
The Tagline is a short description that explains what your site is about. Think of it as a slogan that completes the Site Title. It appears next to the Title in the browser’s title bar, and in some themes it also appears in the site’s header or footer.
WordPress.org default Tagline is “Just another WordPress site”. Please please please, make sure you replace it with your own.
2. Set Your WordPress and Site Address URLs
If you happen to be using WordPress in a different directory than your web root (for example, if you installed WP in a blog directory), then you’ll need to let WordPress know that by modifying these two options (Settings » General).

In the WordPress Address (URL) enter the full URL of the directory containing your WordPress core files. Following the previous example, if you installed WordPress into a directory called blog, then the WordPress address would be http://example.com/blog (where example.com is your domain). If you installed WordPress into your web root, this address will be the root URL: http://example.com.
In the Site Address (URL) enter the address you want people to type in order to reach your WordPress site. The Site address (URL) should be identical to the WordPress address (URL) unless you are giving WordPress its own directory (as explained above).
3. Set Your Timezone, Date and Time Format
In Settings » General you’ll find the options for Timezone, Date and Time Format.
Choose a city in the same timezone as you are or a UTC option if you don’t find your city. Now your posts’ time will be synchronized with your actual timezone and your posts scheduling will work as you expect.
Date and Time format settings control the way they’re displayed in your site. They usually appear as the metadata of your posts and tell the visitors when were the posts published or updated. You can choose one of the preformatted options or generate a format of your own.
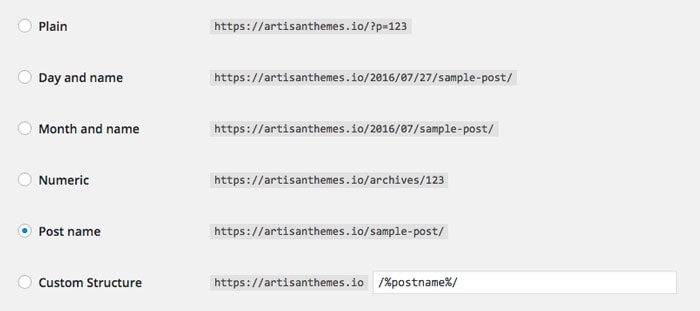
4. Change Your Permalink Structure
One of the most important elements in WordPress sites. Permalinks are the permanent URLs to your individual pages and blog posts, as well as your category and tag archives.
The default structure is “Plain”, meaning that your pages and posts URLs will look something like yourdomain.com/?p=123. That’s not something you want and, for sure, that’s not something search engines like.
So let’s turn those ugly Permalinks into pretty Permalinks. Navigate to Settings » Permalinks and select the structure that suits your site the most. If you don’t like any of the provided options, you can build a structure of your own. But make sure you include the post name for better SEO love. Here are the available tags for you to use.
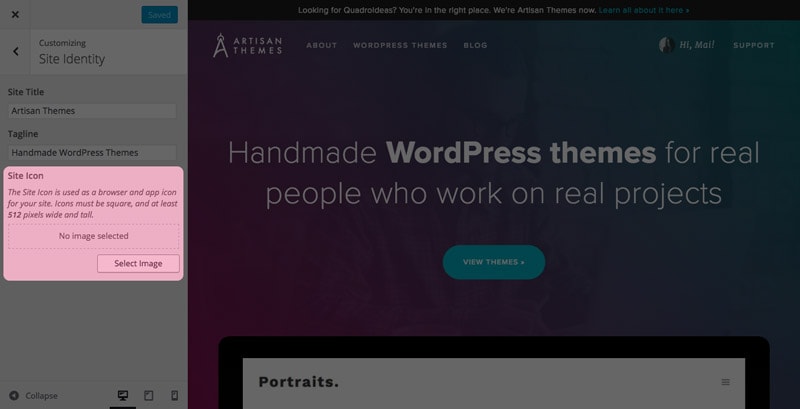
5. Upload a Favicon
A favicon is an icon that represents your site across the web and devices. It’s a part of your site’s visual identity and helps people to easily and quickly recognize your website.
Since WordPress 4.3, you can add a favicon (or a Site Icon) from the WordPress dashboard. Go to Appearance » Customize » Site Identity tab. Click on the select file button and upload the image you want to use as site icon. According to WordPress, icons must be square, and at least 512 pixels wide and tall.
6. Choose Your Discussion Settings (Comments)
Will you want anyone to be able to post a comment in your site? Will you want commenters to fill out name and email? Do you want them to be registered and logged in to comment? Do you prefer to manually approve every new comment on your site?
You’ll find all these options in Settings » Discussion. On this screen you’ll be also able to control the circumstances under which your site sends you email notifications about comments.
Content
7. Remove Sample Content
When you install WordPress on your domain, you’ll notice it comes with a sample post (the famous “Hello World!”) and a sample page created. That’s so you can already see something in your site instead of seeing it kind of empty and broken. But you won’t be using those.
So instead of leaving them there and taking a chance on forgetting they even exist when your site is ready, go and trash them right away.
To remove the sample post: go to Posts and hover on the Hello World post. You should see the Trash link. Click on it, and then go to “Trash”, hover the same post and hit Delete Permanently.
To remove the sample page: go to Pages and hover on the Sample Page page. You should see the Trash link. Click on it, and then go to “Trash”, hover the same post and hit Delete Permanently.
8. Add Categories and Change the Default One
The default posts category when you install WordPress is called Uncategorized. If you don’t set a specific category for the posts you create, they will automatically be archived under the default category.
To change the default category name go to Posts » Categories, hover on Uncategorized and click Edit. Don’t forget to change its slug as well.
If you have already in mind some of the categories your blog will have, it’s a nice idea to go and create them now. That way you’ll be able to plan the editorial categories in advance, and won’t need to figure them out while writing a new post and the time to assign it to a category comes.
For that go to Posts » Categories and add them right there. If you want, you can write a description for each one. Some themes will display that description in the archive page, and it’s also a good thing for your SEO.
9. Change Default Widgets on Sidebar
Most themes usually come with at least one widgetized area that is usually the main sidebar displayed next to your posts. Other themes may come with more sections for widgets like the footer. By default, WordPress places some widgets on the main sidebar: Search, Archives, Recent Comments, Recent Posts and Categories widgets.
Don’t forget your sidebar may appear in some locations in your website (sometimes is on an archive page that you even forgot it exists), so go ahead and decide if you’re going to keep those widgets or what exactly you want to put there. For that, navigate to Appearance » Widgets.
10. Create a Home Page and Set Reading Settings
WordPress powers now 26% of the Web and there’s no need to say that its usage is far (FAR!) away from being just a blogging platform. If you’re not using your WordPress site mainly as a blog, then you’ll probably want to create a homepage that is not your latest posts.
Go to Pages » Add New. Create a page called “Home” (or the name you wish). Now navigate to Settings » Reading. In the Front page displays section choose A static page, and then select the Home page you’ve created.
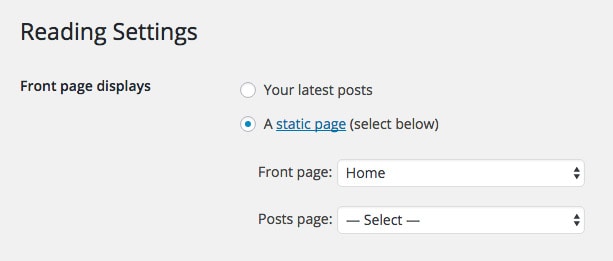
WordPress Reading Settings
If you want, you can also set your Posts page let’s say for a new page that you can name Blog. But depending on the theme you’re using, there’s maybe another way to create a page with your blog posts, like using a specific page template.
Exclusive Bonus: Download the Ultimate WordPress Website Checklist including everything you need to make sure your site is ready and optimized for your visitors.
11. Create a Custom Menu
By default, most themes will take the existing pages on your site and place their links in the navigation area in your site. But we all know that’s not the prettiest way to build a navigation menu for your website.
The Menus screen found under Appearance » Menus enables a user to create custom navigation menus and place them in different locations over the site. Many themes come with more than one location for menus, but most of them come with at least one and that is your site’s header.
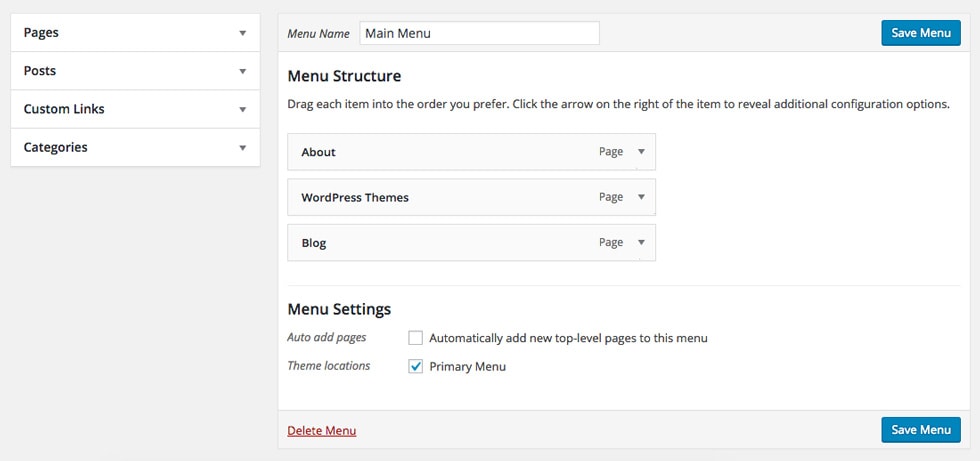
WordPress Menus
Creating a Custom Menu instead of leaving the default page links in your header will let you:
- Drag, order, reorder and rename menu items.
- Create sub-menus.
- Create menu items that are not pages, like custom links, posts and categories.
- Use, afterwards, the same menu on different places, like widgets.
- Customize the menu items by playing with the Link Target, CSS Classes, Description.
Users
12. Change Default Admin User
Make sure you change the admin username to a unique one. Leaving the admin username like that may end on a security vulnerability for your site.
And if you didn’t already, change your password to a more complex one. A password that combines letters, numbers and special characters is definitely the way to go.
13. Complete Your Profile
Make your WordPress profile match who you are. Go to Users » Your Profile. There you’ll be able to enable/disable the Visual Editor when writing posts and pages, to select an Admin Color Scheme, to decide if you want to show or not the Toolbar when viewing your site (I personally hate having the toolbar on the frontend, it’s the first thing I turn off when working on a fresh install).
And more important, you can fill in your details and decide how to show them. Insert your first and last names, and then select a “Display name publicly as…” option. This will apply to every place in your site where your name is displayed: author archive page, author name in posts, user name in forums, etc.
You can also add your Contact Info and a Biographical Info. Depending on the theme, these may show up in different locations.
14. Get a Gravatar
Your name, contact info and bio are set up. But what about having a profile picture?
WordPress uses a specific type of avatar called Gravatar (Globally Recognized Avatar). Gravatars follow you around the web and automatically appear when you post a comment on a WordPress site or sign up on a WordPress site with your email account.
To create your Gravatar go to gravatar.com. You’ll be able to register an account based on your email, and upload an avatar to be associated with the account.
Author’s Gravatar in Author Archive Page – Indigo Theme
Depending on the theme, Gravatars may be displayed next to your author info in a post you wrote, on a comment you made or a forum topic you’ve responded.
15. Add Other Authors
You know your site is going to have other authors? Navigate to Users » Add New and create the profiles for them. You’ll be required to fill in Username and Email. A Password will be automatically generated for you, but I recommend you to click on “Show Password” if you want to grab it and copy it to a data file with all your site’s credentials.
In the same screen you can decide if you want to send the new user an email notification about their account and the role he/she is going to have in your website.
Remember the email address you set is the one that brings the person’s Gravatar, so you may want to use for your authors the email that they use for their account at gravatar.com. Or you can use another email address but then remind them to add that email to their Gravatar account.
Plugins
16. Delete Unused Default Plugins
WordPress comes with two already installed plugins: Hello Dolly and Akismet. We’ll get to Akismet in a moment. For now, and even if it’s really nice to have random phrases from Louis Armstrong’s Hello, Dolly in your dashboard, I’d say you should delete it.
Here are a few of the phrases so you don’t miss the plugin when it’s gone. You’re invite to come back here every time you feel Hello-Dolly-Sick:
- “It’s so nice to have you back where you belong”
- “Dolly’ll never go away”
- “You’re still glowin’, you’re still crowin’”
- “So, take her wrap, fellas”
- “We feel the room swayin’”
Sometimes when getting a WordPress installation from your hosting service, there might be other plugins already installed. Make sure you check them out and see if you really need them. If not, remove them from your site.
17. Install Recommended Plugins
Anti-Spam
WordPress sites can get lots of spam comments sometimes. Fortunately, there’s something we can do.

Akismet
Akismet is a plugin that checks your comments to see if they look like spam or not and lets you review the spam it catches under your site’s “Comments” admin screen.
It comes already installed with your WordPress installation. You’ll need an Akismet.com API key to use it which is free for personal sites. Activate the plugin and fill in your API key.
Antispam Bee
Another popular solution to fight spam. This free plugin will help you block unwanted comments on your site.
SEO & Analytics
Yoast SEO
One of the best and most complete Search Engine Optimization solutions for WordPress. The Yoast SEO plugin guides you through some of the settings needed in order to optimize your site. It’ll help you write better content that cares for keywords and readability. It’ll also generate a sitemap of your site.
Google XML Sitemaps
If you didn’t install Yoast SEO or if your SEO plugin doesn’t automatically creates a sitemap, install Google XML Sitemaps. This plugin will generate a special XML sitemap which will help search engines to better index your site by understanding its structure. In addition, it notifies all major search engines every time you create a post.
Google Analytics
Every site, as little as it can be, needs statistics. Google Analytics is a free service that tracks all sorts of insights about your website’s visitors, so you can improve wherever necessary to get better results and keep them coming back.
First, create an account at Google Analytics. And then, if you’re not using a custom developed theme, you can get a plugin that will install the code for you. These are a few options:
– Google Analytics by MonsterInsights
– Google Analyticator
– Google Analytics
SEO is a wider topic than what we can cover here. If you’re interested in learning more about it, here’s a beginners guide to SEO from isitwp.com.
Cache
On top of using performance optimized themes and plugins, caching is the best way of optimizing WordPress sites. Being that WordPress is a CMS that serves dynamic websites, every time a page is loaded the server needs to process it all over again. That means the page is going to consume a specific amount of server resources which will affect the load speed, and the amount of pages that can be served at any specific time.
When you use caching the server returns a “static page” for the requested URL, which uses way less resources and improves both the loading speed and the amount of pages per minute you can serve.
Unless your site runs on a server that is already using some way of caching (here’s a link to all the recommended ways on the Codex) and even then, plugins are the fastest way to get started with caching. You should use one, and these three are the most populars:
WP Super Cache
WP Super Cache is the most popular option between cache plugins. It’s pretty straightforward to setup and has really good speed results (achieved by the technologies it uses to cache the pages). On the downside, the most optimized part of this can’t be used for logged in users. If you don’t need to present content to logged in users, this plugin might be the one to go with.
W3 Total Cache
W3 Total Cache has similar performance results than WP Super Cache but with a much (much) more complicated setup environment. Of course, that means that it has a plethora of advanced options that will let you modify almost everything in the way it works. It can be a little bit of a pain to configure, but if you need something specific taken care of, this is the one.
WP Rocket (Paid)
WP Rocket is the one of these three that has the fastest results according to several benchmarking tests (like this one here). The setup is extremely easy and -probably as a consequence of being a paid one- it has a really good support team behind. It doesn’t come with a lot of advanced options so there’ll be times when you may be needing something the plugin doesn’t get to do. And, again, it’s a paid one. All in all, it’s the one we’re using here on our site and we couldn’t be happier with it.
Security & BackUp
WordPress itself is a very secure platform. However, there’re some plugins that can help in adding some extra security to your site. And if unfortunately your site gets hacked and you need to recreate it, it’s always a good idea to have regular backups of your database nearby.
WordFence
The Wordfence security plugin provides free enterprise-class WordPress security, protecting your website from hacks and malware. The plugin scans your site and alerts you quickly if your site is compromised.
Among its features you’ll find a WordPress Firewall, Blocking Features, Login Security, Security Scanning, Monitoring Features, Multi-Site Security, Caching Features, and more.
It has a fully-functional free version and a premium one that gives you Premium Support, Country Blocking, Scheduled Scans, Password Auditing, etc.
All In One WP Security
All In One WP Security is a free, comprehensive, user-friendly, all in one WordPress security and firewall plugin. It reduces security risk by checking for vulnerabilities and by implementing and enforcing the latest recommended WordPress security practices and techniques.
This plugin cares for user accounts security, user login security, user registration security, database security, file system security, htaccess and wp-config.php file backup and restore, and more.
UpdraftPlus WordPress Backup
This free plugin keeps your WordPress website, its media and database backed up to Dropbox, Drive and a lineup of other storage options on a regular basis. You can choose how often you wish your backup to be performed, and control exactly what is going to be backed up.
You can always make your website better. Download the Ultimate WordPress Website Checklist and make sure your site is ready and optimized for your visitors.
Themes
18. Install and Activate Your Theme
If you’re not going to use one of the themes that get installed by default, you’ll need to install and activate your desired theme.
When using an external theme, one you downloaded or purchased outside of the WordPress themes repository, you’ll need to upload it by following one of these options:
a. Upload through WordPress: From the WP menu go to Appearance » Themes » Add New » Upload Theme. Then, choose the [theme-name].zip file.
b. Upload through FTP: Unzip the [theme-name].zip file and upload the theme folder using your preferred FTP client into the wp-content/themes at your domain.
Once you have uploaded the theme click Activate (Appearance » Themes » Your uploaded theme).
Another option is to look for a theme in the WordPress Theme Directory, which has a collection of themes you’ll be able to install right from your dashboard. Navigate to Appearance » Themes » Add New, and you’ll see the available themes from the repository. Just select the one you like and click Install.
19. Remove Unused Themes
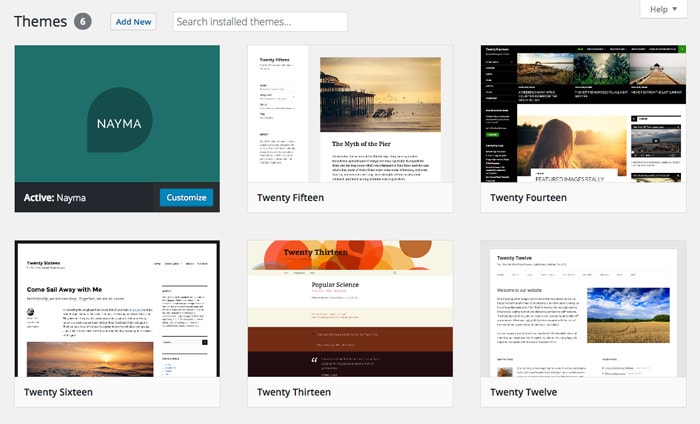
WordPress comes with its own default themes known as the Twenty-Something series. After you install and activate the theme you’re gonna use, why leave the others occupying space in your install?
Or maybe you’ve tried installing several themes before you decided which one to use for your site.
Old themes and plugins that are not regularly updated put your site’s security at risk. So just remember to later delete those themes you won’t use.
Go to Appearance » Themes, click on the theme you want to remove. It’ll open a lightbox, and on the bottom right corner you’ll find the Delete link.
Extra
If you’re working on a client website, there’re a few more things you may want to keep in mind.
20. Don’t Forget to Change the Admin Email Address
If you won’t be working with your client on a periodic basis doing maintenance or admin work, if you’re just going to deliver the site and from now on the client will take care of it, then you’ll probably want to remove your email address from the WP install. There’re two places where you’ll need to change the email:
a. Settings » General » Email Address.
b. Users » Select your user » Edit » Email.
21. Brand Up Your Login Page
If you’re working on a site for a client it’s a good thing to tune up a little the WordPress login page and make it look like part of your studio identity. Changing the WordPress logo above the login form in the /wp-login page may be a good idea for that. It’ll remind the client who you are and who built his site everytime he enters the dashboard.
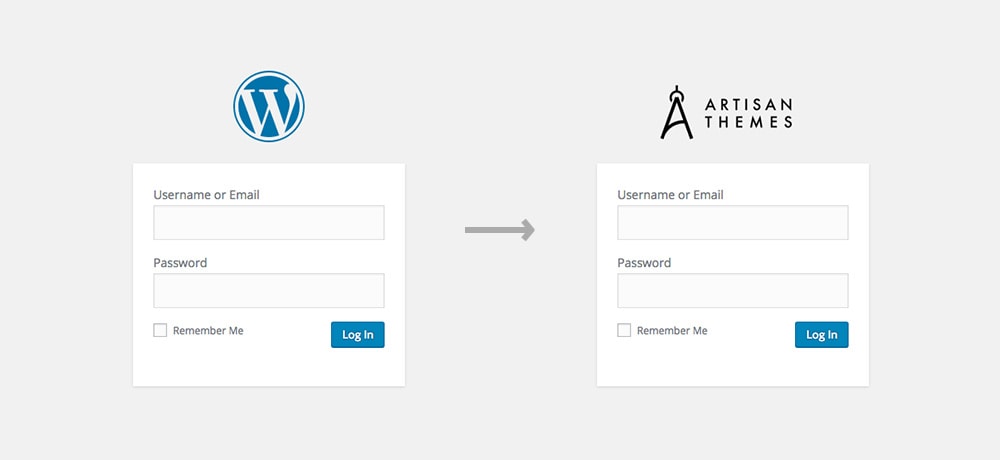
Changing the WordPress logo above the login form
There are many ways to do that:
a. If you’re using one of our themes: Go to Appearance » Theme Options » General » Branding section, and upload your “Custom Login Image File“.
b. With a plugin: Uber Login Logo or Custom Login may be good options.
c. Through custom code: Learn about it here.
That’s it!
Your WordPress install is set up and ready to go. Do you have other WorPress-musts in your repertoire? Share them in the comments!
¡Un post grandioso!
Thanks this really helped
How is using WordPress for your site platform? I’m new to the blog world
but I’m trying to get started and set up my own. Do you require any html coding knowledge to make your own blog?
Any help would be really appreciated!
Hi Eugenio! WordPress is the easiest way to start a blog, and you don’t need any html or tech knowledge to start. 🙂
It has a small learning curve, but it’s definitely fun and it gets easier every day.
Thank you so much this helped me build fast on my website.
Big thanks
I’m also using Akismet pro for my personal blog and for seo all-in-one plugin, and then everything like in your list. Thanks for sharing.