If you’re new to the WordPress world you’ll find yourself swimming in a pool full of whole new words.
And that can be scary. Like: What Permalinks even mean? Right?
It’s almost like learning a new language.
And when you start learning a new language one of the first things one usually does is getting a dictionary.
But hey, I’ve studied Semiology (yeah, here comes the academic shoutout, give me my 2 minutes of glory to justify my college degree). I know that we don’t learn words as abstract entities but inside contexts.
So I wanted to put together a WordPress glossary that isn’t necessarily alphabetically ordered (which is actually very arbitrary), but one that’s structured by the different areas involved in working with WordPress.
One that you can refer to whenever you see a new term you didn’t know yet.
With simple descriptions and useful tips when needed.
Its purpose is to introduce you into the world of crafting your website with WordPress, covering all you need to know.
Let’s get it started.
I promise I’ll try not to use more Aladdin gifs.
…well, I can’t promise that.
WordPress Glossary
General website terms
Header
The top part of a website. Conventionally present on every page of the site. It typically contains the site’s title or logo and the main navigation menu. It can also be located on one of the site’s sides, depending on the site’s design.
Footer
The bottom part of a website. Present on every page of the site. It can include information such as the site’s copyright notice, contact links, social media links, a secondary navigation menu, formal statements, links to pages like Privacy Policy or Terms and Conditions, credits, etc.
Navigation menu
A group of links to the pages on your site. It’s used to browse the content of a website, therefore its importance in terms of User Experience. It can include main items and sub-items (pages inside other pages), and also external links (links that take you to a different website).
A website can have more than one navigation menu, like a primary nav and a secondary nav. E.g., on a Magazine website: a menu with the sections of the magazine (“Sports”, “Food”, “Lifestyle”) and another menu with institutional pages such as “About”, “Contact” or “Subscribe”.
Each navigation menu should have its own structure logic to help the user identify when to use it, how to use it and what she should expect to find inside.
Above the fold & Below the fold
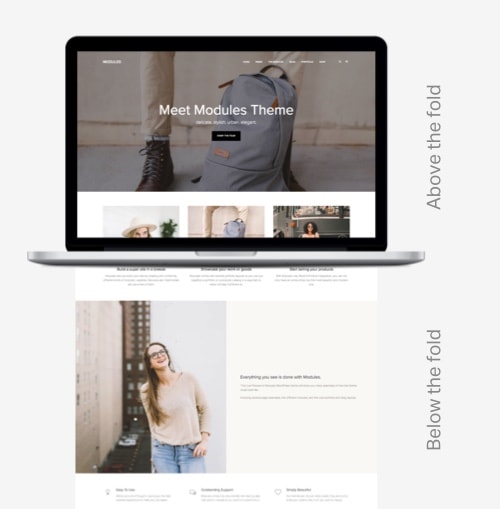
Above the fold / Below the fold
Above the Fold is the term used to define the first visible part of a website, what you see without having to scroll. Its size will vary according to each screen size. Usually includes the site’s header and the main proposition + call to action for the user to understand what’s the website about.
Everything that’s after the above-the-fold part is called Below the Fold and it’ll appear when the user starts scrolling the website.
Content area
The area of the website containing the main content. Sometimes it occupies the whole width and other times it shares the space with a sidebar or a widget area.
Sidebar
A column next to the main content area containing complementary content such as widgets, short texts, subscribe forms, social links, etc.
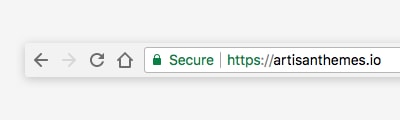
URL
Is the address of a specific website or page/file inside the website. The URL is displayed on your browser’s top bar. E.g., https://artisanthemes.io or https://artisanthemes.io/wp-content/something.jpg
Link
A link or hyperlink is an element that points to another element both inside or outside the website. When the user clicks on the first element, it takes him to the second one. This is a link to our homepage.
In HTML, this is the basic structure of a link:
<a href="https://artisanthemes.io">Text</a>
The “href” part indicates what’s the link pointing to. It can be a full URL or even the ID of a section on the same page, i.e “#creating-content” (*wink wink*, this last option is usually how the navigation for one-page sites is done).
Back-End
In WordPress, the back-end is the area that’s only accessible to authorized users. Is where you manage your site: from creating content to handling your site’s appearance and functionalities.
To enter your WordPress site’s back-end go to yourdomain.com/wp-admin. Only users with a password and an appropriate role will be able to access.
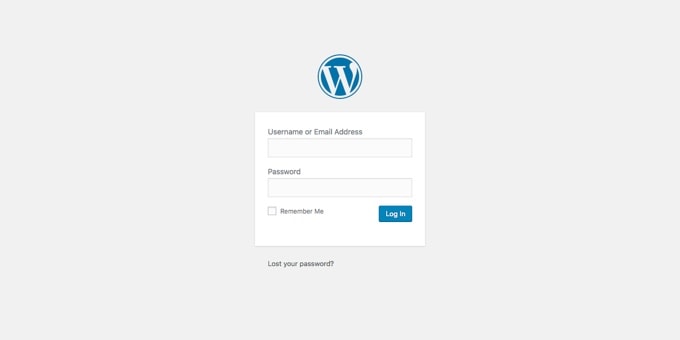
WordPress Back End Login Screen
Front End
In opposition to the back end, the front end is the visible side of your website. Is what visitors will see when they enter yourdomain.com.
Cache
Simply put, cache is a process that stores data from a website so the browser can access it faster each time a user requests to.
You’ve probably heard the words “empty your cache”. What it means is to remove the stored data so the browser can load the site as if it was the first time it loads it, with no previous data recorded from that website.
Having a cache solution on your website is a recommended practice in order to improve its performance.
When using WordPress, you may have a cache service integrated into your hosting service, and you can also install a cache plugin.
An important tip:
You might sometime find yourself asking “Why do I see my website like this while visitors say they see my it different?”. The answer for that is probably the cache.
Caching plugins usually are set to show you (the admin) a non-cached version, so you can see all recent changes. Visitors are probably not seeing the most updated version of your site. The solution is easy: purge your site’s cache. If you’re using a plugin, there’s always a button for that, and if it’s your hosting’s cache system there should be an empty-cache button in your hosting panel.
Responsive
Refers to the website being rendered well on different devices and screen sizes. A user entering your website from his mobile or tablet should be able to view it and use it as smooth as it’ll be on a desktop screen.
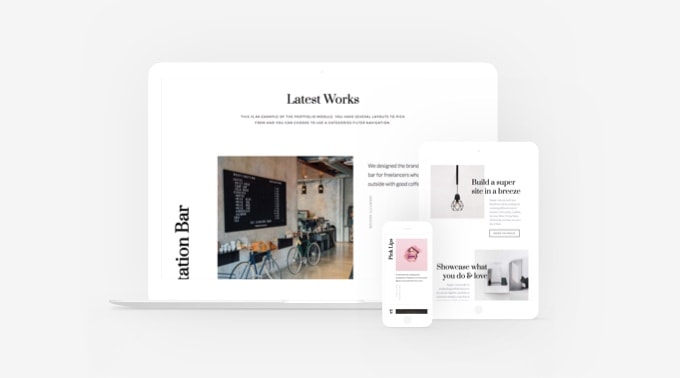
Responsive website layout (Pepper+ WordPress Theme)
Call to action
Is a clear instruction of an action you want the user to take. Usually designed as a button. For example: Sign Up, Download, Read More, Browse Products, Buy Now, Purchase, Contact Us.
It’s highly important that you add calls to action in your site to guide users through it and towards the actions you need them to do to achieve your and their goals.
WordPress back-end and settings
Administration Screens
Your WordPress back-end includes many different administration screens. Each one will have the toolbar at the top, the main navigation menu on the left and the work area, which is the biggest area, in the middle of the screen.
Each screen will let you work on a different part of your website. Whether it’s your posts, your pages, WordPress settings or the Plugins, each one is an admin screen.
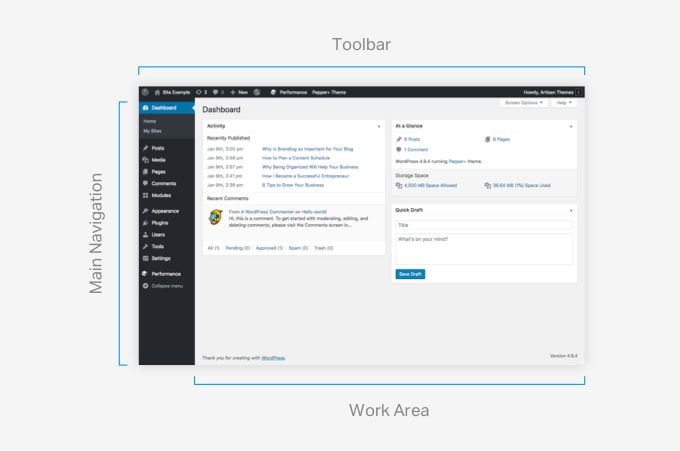
The WordPress Back-End
Toolbar
Is the top bar on your WordPress back-end that includes useful links to main admin actions such as adding a new post, viewing your site, viewing available updates, logging out, etc.
It’s also visible on the front by default, but you can turn it off by going to Users » Your Profile.
Main navigation menu
Gives you access to everything you can manage on your site: content creation screens, Appearance screens, Settings, Tools, Users, Plugins, etc.
Themes and plugins can add their own items to this menu, so you can use them to manage them too.
Dashboard
Usually misused to name the whole WordPress back-end, the Dashboard is actually just the first screen that shows up when you log in to your site. It puts together important information about your site and from external sources such as WordPress meetups (which is very cool, to be notified about your local community events).
Updates
As any other software, plugins, themes and WordPress itself are periodically updated. These updates usually include bug fixes, security improvements and new features.
When an update is available you’ll see a notification in your Toolbar.
It’s highly recommended that you perform those updates to keep everything working properly and get the new additions too.
Before you update, it’s recommended that you do a full backup of your working site so you can get back to it if something breaks up with the update. Read about backup plugins on this post.
Appearance
The Appearance administration screen will give you access to different configurations involved in how your site looks: Themes, Customize, Menus, Widgets, and Editor.
Themes
Is where you’ll upload and select the theme for your website. All the installed themes will appear there, but you can only activate one at a time.
You can also browse the WordPress free theme directory from there, without leaving your site.
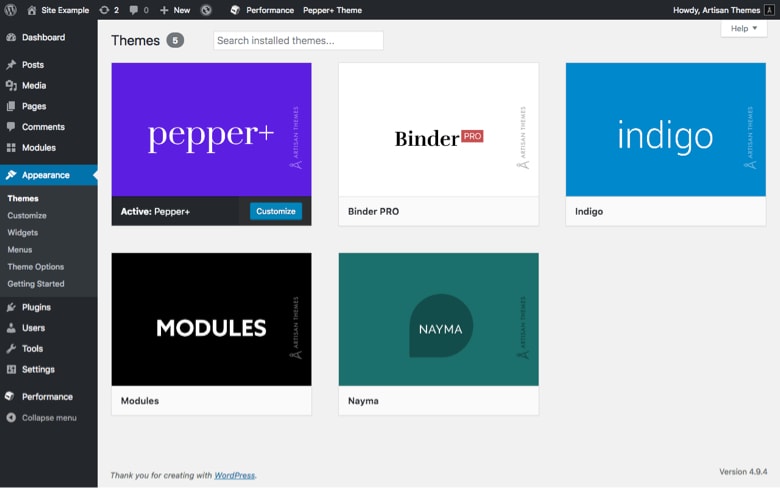
Appearance » Themes screen
Customizer
When clicking on Customize from the Appearance menu, it’ll take you to a live-preview editor of your site.
Many of your site’s settings will appear there and you’ll be able to play with those while seeing the changes live on your site. Those changes won’t be published until you click on Save & Publish.
Menus
Is the administration screen to manage your navigation menus. You’ll be able to create and edit different menus and assign them to locations on your site.
Widgets
Is the screen where you can add widgets to the different widget areas on your site, and customize them.
User
WordPress is a Content Management System, and as such it’ll need at least one user to manage the site. This is the administrator user, someone with a username and password who can access the site’s back-end and perform all the actions involved in managing the website.
But a WordPress site can have more than one user. It actually can have as many as you want, and with different permissions and capability levels.
Roles & Capabilities
There are 6 types of roles that a user can have, each one granting different capabilities to the user (what she or he is allowed to manage when accessing the website).
From the highest role in terms of capabilities to the lowest, these are:
Super Admin (only available in Multisites), Administrator, Editor, Author, Contributor and Subscriber.
Gravatar
The term Gravatar stands for Global Recognized Avatar: a system that allows you to have an online profile picture that is automatically displayed when you write a post or a comment on any site that belongs to the WordPress network.
It works by assigning to your email account -or accounts- a picture that you upload. Each user should create an account on Gravatar.com and upload its picture for it to work.
Permalinks
Permalinks are the permanent URLs to your site’s content: posts, pages, category archives, etc.
You can choose the structure of your site’s URLs in Settings » Permalinks. Several options are available and you can even create a custom structure of your own.
The most recommended structure is one that includes the post or page name as it builds the most usability and search engine friendly URLs.
Avoid using the plain option.
Permalinks Flush
Flushing your permalinks might be useful when a custom post type is redirecting to a 404 Error page or if you’ve tried to navigate to a newly created Page and encounter an error.
It actually means to refresh your permalinks and it gives your site a chance to find and properly display the new content.
To do that simply navigate to Settings » Permalinks, scroll down and click “Save Changes“. That single action will prompt the site to refresh all the permalinks.
Screen Options
Each administration screen displays different options in the work area. Sometimes, available options can be hidden and you’ll need to specifically enable them. Some other times you’ll find yourself not using some of them and you’ll want to hide them.
To do all that, open the Screen Options panel at the top right corner of the screen and select which options to show and which ones to hide.
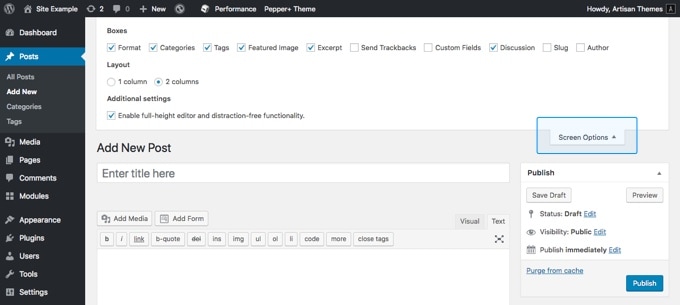
Screen Options Tab
Title & Tagline
The title and the tagline are essential elements that help to identify your website. They tell people and search engines what your website is about.
You’ll find them under Settings » General.
The title works as the name of your website while the tagline is a short description that explains what your site is about.
Depending on which theme you’re using the title and the tagline may show up or not on the front end, but they will be present in the browser’s title bar and will give information to search engines.
Import & Export
WordPress allows you to take your content with you everywhere. By going to Tools » Export you’ll be able to download an XML file with all your site’s content that you can then import to any other WordPress site (by going to Tools » Import).
You can also bring your content from other CMS or blog platforms such as Blogger or Tumblr.
There’s one thing you need to know about this: importing content doesn’t mean it’ll look exactly as it did before. Content is not all that makes a WordPress site, there are also settings and configurations involved, media files, and more.
So, if you’re looking to migrate a whole site from one WordPress installation to another you might want to try a different solution such as this one. And if you’re looking to make a backup of your site’s content you should check backup solutions as the ones mentioned in this post.
Creating content
Post
Posts are articles you usually create to put together a blog or a magazine. These can be news, recipes, interviews, stories, updates, events, reviews, or anything you want to write about.
Posts have two instances of view: the single view and the blog view. The blog view is when posts are listed on a page, typically ordered by date, from the newest post to the oldest one. They can also be listed in a magazine style, per categories or according to different criteria. In these cases, the post is usually displayed as a summary (excerpt) instead of portraying the whole post.
When you click on a post’s title it’ll take you to the single view where you’ll see the whole post content, be able to comment, to share, etc.
There’s no limit to how many posts your website can have. It’s up to you :).
 Status
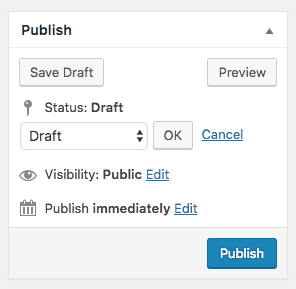 Status
When you add a new page or post, it won’t be published on your site until you click “Publish”. Status refers to the post/page being published, draft, pending review, private or in the trash.
By default, WordPress autosaves every post or page you create as a draft.
Published
Means the post or page is online, visible to your visitors and search engines. In the case of pages, it doesn’t necessarily mean they will be added to your navigation menu (menu items are managed through Appearance » Menus). A post or page will be published when you intentionally click on “Publish”.
Draft
When a post or page is saved but not published yet. If you’re working on a new post, make sure you always click on “Save Draft” instead of “Publish” if you don’t want it to be visible yet.
You can preview a draft post to see how it will look like when it’s published by clicking on the Preview button or on the post’s permalink.
Pending Review
Technically is the same as having a draft, in the sense that it won’t be visible on your site. But if you’re working with an editor, or you finished the post but you feel like it still needs to be reviewed, you can set its status to “Pending Review”.
Private
Posts or pages only accessible for logged-in users with Administration level.
Trash
You can send posts or pages to the Trash. Those won’t be completely removed from your site unless you go to the Trash and delete them permanently. Posts or pages that are in your Trash can be restored anytime you want.
When entering your Posts or Pages admin screen, you’ll see a navigation on top of the list with the different statuses which you can use to filter the existing posts. And see, for example, which posts are pending review or which ones are drafts.
Editor
Is where you write your posts or pages content. On its top bar you’ll find several format options to shape your text: different headings, bold, italics, lists, colors, text-align options, etc.
In can also include different media elements such as images, galleries, videos or embeds.
In short, if you’ve used Word or Google Docs, you’ll know how to use the WordPress editor.
Visual / Text modes
The editor has two different visualization modes: Visual and Text.
The Visual mode is the regular one, the “what you see is what you get” editor, a.k.a. WYSIWYG. Which means your content will look very close to how it’ll be displayed on the front-end.
The Text mode is a plain version of your content. It displays the elements as HTML and therefore allows you to insert HTML code within your content.
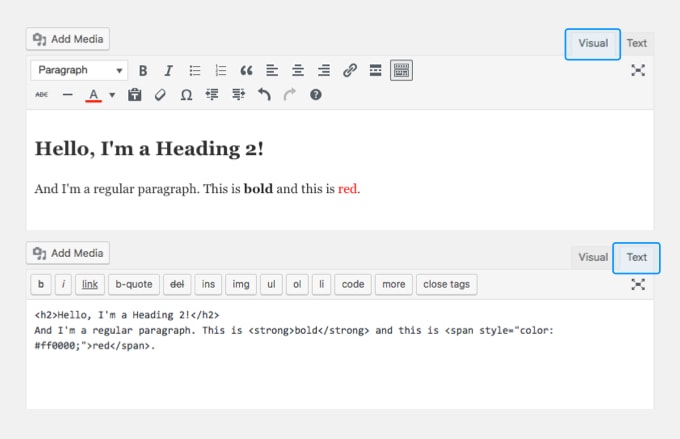
Editor – Visual / Text Modes
Headings
The WordPress editor lets you select different hierarchies of headings to your text, from Heading 1 to Heading 6. This allows you to create hierarchy within your post content, separate sections and give importance to specific parts.
On the front-end, themes usually style those headings with different sizes, with Heading 1 being the biggest and Heading 6 the smallest.
Use headings to improve your content readability and your post’s SEO.
Media
WordPress allows the use of all sort of media files types: images, videos, audios, and documents. (Read here which file formats are allowed.)
All the files you upload will be stored in the wp-content folder of your WordPress installation. And you can access them through the Media button located on the left menu in your back-end.
If you’re editing a post or a page, you’ll see an “Add Media” button right above the editor. By clicking on it you’ll be able to upload a file and insert it into your content.
Image
Images can be placed within the content with styling options such as alignment, size, link, and caption.
Gallery
In addition to single images, WordPress lets you add a group of images that will sit together as a gallery. Click on “Add Media”, select more than one image and instead of clicking on “Insert into post” choose “Create gallery”.
Themes treat and style galleries differently. Put a gallery in one of your posts and discover how your theme shows it.
Video
Videos can also be included within your content. But because of their weight is usually recommended that you upload them to a third party video server (like YouTube or Vimeo), and place them in your site with an embed code.
Embed
WordPress allows you to embed external content inside a post or a page, like videos, Google maps, tweets, Instagram posts and more.
Some of those can even be automatically embedded thanks to the oEmbed feature. For example, you don’t need to copy the iFrame of a YouTube video in order to embed it into WordPress, you just insert the URL of the video (e.g. https://www.youtube.com/watch?v=g82gRxVbC9I&t=1s) right inside your content on a separate line and WordPress will automatically turn the URL into a video.
oEmbed supports many popular sites, check the full list here.
Featured Image
Is the main image that goes along with a post. You can use as many images as you want inside the post, but you can only choose one to be the post’s featured image.
The featured image is commonly used by themes to identify a post by displaying it next to the post title or excerpt, in a blog, magazine sections, recent posts widgets and such.
It’s also commonly used outside your website when you share the post link on social media or other platforms.
Excerpt
Is a brief extract of your post content. It can be automatically generated by grabbing the first sentences of your post, but you can also write it manually in the excerpt field below your post content.
The excerpt is normally displayed on blog or magazine areas where just a summary of the post is shown. And it can also be shown on external platforms when sharing your post’s link.
Slug
Slugs are the URL friendly version of your posts and pages titles. If you have a page called “About us”, the slug will probably be “about-us”, turning the whole URL of that page into yourdomain.com/about-us.
The structure of the slug is determined by the Permalinks structure you’ve set in your settings, and it will be automatically generated when you enter a page’s title, a post’s title or add a new category, according to those settings.
But you can also modify the automatic slug and insert one manually.
Slugs are very important to SEO and general UI, as they give information to search engines and users about the page or post they’re viewing.
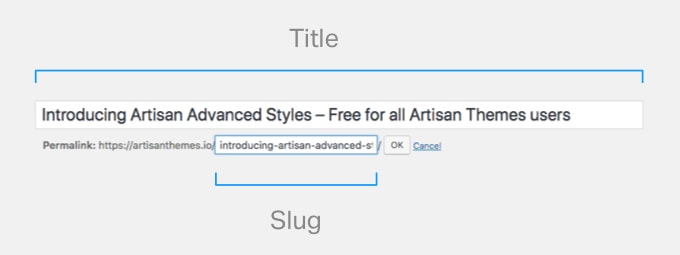
Example of a Slug
They’re also used for categories, tags and other elements in your site.
It’s recommended that you use concise slugs, with the most important words of the title in it. So if you have a post with a very long title like “8 Recipes to Make the Most Fabulous Dinner for Two in the Summer”, instead of your slug being “8-recipes-to-make-the-most-fabulous-dinner-for-two-in-the-summer” you may want to use something like “recipes-dinner-for-summer”.
Taxonomy
One of the most amazing things about WordPress is its simple and -at the same time- powerful logic. Taxonomies are one of the major representatives of that. In WordPress you can not only create different kinds of content but also classify them.
This classification method let’s you connect and organize the information on your site in powerful ways.
Like creating different category sections for your posts in a magazine, letting users navigate your content through tags that interest them, or connecting posts to specific content just because they share a taxonomy (like for example: posts related to an event).
By default, WordPress comes with two types of taxonomies for posts: Categories and Tags.
Category
Categories are like big topics of your blog. A post can have more than one category assigned, but usually it belongs to a one or a few, tops.
Categories are pretty steady. You probably won’t be changing them all the time nor adding new ones every day.
If you’re building a blog or a magazine, you should think about which categories it’ll have before you start creating your content. It’ll help you get more organized and build a categories list that makes sense for your content and your audience.
If you have a food blog, a simple category example could be Recipes.
Tag
Tags are “smaller” than categories and usually more sporadic. They are like keywords that are mentioned in a post, and can later on help identify mini-topics in the content.
A post can have many tags, and it doesn’t matter if they already exist on your site or not, you can constantly add new ones. Although if you use the same tags you used before, a user will be able to click on one and see all the posts that have that specific tag.
With the same food blog and Recipes category, some tags could be: chocolate, rice, Thai, healthy, quick.
Publish / Update
When you create a new post or a page on your site, those will be “drafts” until you click Publish. After they are published, every time you edit them you need to click Update in order to make your changes appear in the front-end.
Revisions
Each time you click on Save Draft or Update when creating a post or a page, WordPress will automatically save a record of that version.
You can later enter the Revisions panel and compare different versions, see what’s changed, what’s been added and even restore to a previous version of that post or page.
Comments
WordPress started as a blog platform and one of the most common things on a blog is the ability for users to comment on posts. Comments encourage interaction with your readers and are a great opportunity to engage with them and make them a part of your content.
Comments in WordPress are also available for pages, though it’s not a common practice to allow comments in there.
You can manage your comments settings in Settings » Discussion. And manage the comments themselves (approve them, reject them, mark as spam, etc.) from the Comments link on the main left navigation in your back-end.
Post Type
Post types include all the content types that WordPress handles as “posts” in the database. In addition to regular Posts and Pages, there are three more native post types: attachment, revision, and navigation menu item.
But the most interesting part is that some themes and plugins create new custom post types and add them to your WordPress installation. Products, portfolio items, contact forms, events, are just a few examples of the most common custom post types you can add to your site.
If you’re using one of our themes, you probably noticed that the modules available to build your pages are also a custom post type.
Custom post types usually support custom taxonomies. For instance, if you have products on your site you’ll probably have specific product categories for them such as: Woman, Man, Shoes, Tops, Pants, etc. And those will be different and separate from your blog categories.
Page
Unlike posts, pages are conceived more as static content. They’re not presented in a timeline like posts (time is not even a relevant factor in pages) and typically, once you create your site’s pages you won’t be constantly adding new ones as you would do with posts.
Some common pages you can find in websites are: About, Contact, Portfolio, Biography, Gallery, Careers, Privacy Policy, Terms and Conditions, Shop, Blog, My Account, etc.
As you can see pages can display posts inside. The Portfolio page will have portfolio posts listed on it. The Shop page will have product posts listed inside, and so on.
Pages can be hierarchical, i.e., you can organize them in different levels of sub-pages. For example: About could be a parent page, and have 3 sub-pages like Team, Location, and History.
Template
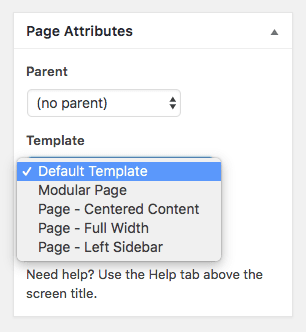
Page Templates
According to your theme, you can select a specific template for a page which will make its content look different on the front-end. The most common page templates are a full-width page or a page with a sidebar.
More sophisticated themes will offer more templates that let you build highly customizable layouts and even specific options to personalize the page’s appearance.
Home Page
Is the front page of your site, the page that shows up first when a user enters your website.
You can define which page of your site will act as your home page by going to Settings » Reading.
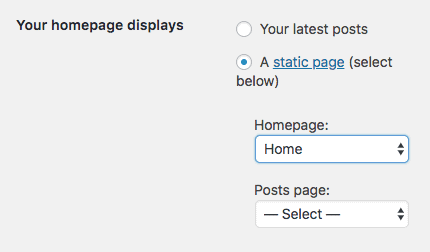
Define Homepage
Landing Page
A landing page is a special kind of page. It’s a page that serves as the entry point for a website and that its purpose is to achieve a very specific marketing goal. Like getting people to subscribe to your mailing list, buy a product, sign up for a webinar, or download a product.
People typically land on this page after clicking on an ad or a specific link you put up somewhere.
It’s usually an independent page, separated from the rest of your site. Therefore, most of the times it won’t use the site’s regular header and footer or the main site navigation menu.
It should be able to stand on its own, without visitors needing to browse your other pages in order to understand it or to proceed with the action you propose to them.
Author
Each piece of content in WordPress is created by a specific user. If you’re working alone, you’ll be probably the only author of your posts and pages, but if you’re not, you could have many users writing content for your site. Your website will then have many authors.
In most cases the author name is displayed next to the post title or the post data, letting the visitor know who wrote that specific article. That’s called the byline.
You can assign already created posts to any author you’d like, even if they didn’t write it.
Shortcode
A shortcode is a way of inserting a piece of code with a specific function inside a regular post or page content.
Many plugins will provide you with shortcodes you can safely add to your text to include the plugin’s functionality in a post or page. Think of it as writing code without having to know how to code.
For example, if you installed a plugin to add a Table of Contents to a post (which I did at the beginning of this post), the plugin will take care of printing that section. You just need to add the provided shortcode where you want to place the table.
WordPress has many built-in shortcodes like the one for galleries. Shortcodes always start and end with brackets, and they can accept many parameters in the middle.
A shortcode for a gallery will look like this:
[gallery id="12,45,96,2,40" size="medium"]
How does it work? You put the shortcode somewhere in your post. When the site loads the shortcode picks up the phone and calls a PHP file and tells him “come here and do your thing”, and the PHP file -because he’s very obedient- does it right there.
Widget
Widgets are small and independent content areas you can place inside sidebars or widget areas. Each widget fulfills a specific purpose, like listing recent posts, listing blog categories, displaying a form, or the shop cart, among others.
WordPress comes with its native widgets, and many themes and plugins add their own.
You can manage your widgets from Appearance » Widgets.
Widget area
Every area in your site that allows placing widgets inside. The most common is the sidebar, but many themes come with other areas like widgetized footers, for example.
All available widget areas will appear on the Appearance » Widgets screen.
Themes & Plugins
Theme
In essence, a theme is the shell of your WordPress website. It will supply your website with a specific appearance and structure. Giving shape to your posts, pages, archive pages, header, footer and all the parts of your site.
There are free themes and premium (paid) themes. And there are thousands to choose from. Here’s an extensive guide about themes: what are they, where to find them and how to choose the right one.
Default theme
By default, WordPress installs and activates one of the community official themes.
You can use that theme or install a different one. But there always must be a theme activated always.
WordPress official themes are very clean. Each year the development team releases a new one that usually goes together with a major software update.
Child Theme
If you happen to have the need to edit your theme’s files, you may be in a hurry when it’s time to update the theme (because all your changes will get overridden by the new files).
To avoid that inconvenience WordPress has a way of including changes through what it’s called a “child theme”.
A child theme is an almost-theme that references another theme (the parent), and that will only include those files which you want to modify (plus a small file to define the theme as a child theme).
The child theme inherits its parent theme functionality and can add or override specific things that you specify. Is the safest way to edit a theme.
Here’s a post about working with a child theme.
Theme Options
Themes usually come with their own settings. These will give you the possibility to adjust specific aspects of the theme’s appearance or layout.
According to which theme you’ll use, the amount and type of theme defined options will vary.
Theme Options can typically be found inside the Appearance menu or inside the Customizer.
Plugin
Plugins are add-ons you can install in order to extend WordPress’ functionalities.
For example, if you’ll have an online shop, you will need to add some E-Commerce functionality. You can do that with a famous plugin called WooCommerce.
And if you’ll want to add a contact form to your site, you’ll need a forms plugin like WPForms.
The plugins market also includes free and paid plugins. Thanks to the WordPress community, you’ll find a huge amount of useful plugins for free. But also don’t be afraid to invest in what your site needs if a plugin solves it.
Technical and advanced terms
Content Management System (CMS)
A CMS is a type of software that allows managing the content of a website. WordPress is, in essence, a CMS and -although there are many others- it’s by far the most popular one.
Domain name
A domain is the address of your site. Like artisanthemes.io.
They’re sold by “registrar” companies, that deal exclusively with this. Purchasing a domain is as easy as entering the domain you want, and if it’s available then buying and registering it to your name.
Its cost varies on which domain you buy, but it’s not a pricy thing. Most domains cost about $10 per year, and some hosting companies will include a domain within their plans.
TLDs (top-level domains) refer to the very last part of the domain that will be different according to your type of website and country code. E.g.: .com, .net, .io, .me, .edu.uk.
If you’re building a website for an educational institution you probably need to use a domain ending with .edu, and if it’s for an NGO you should probably go with a .org domain.
Here’s a good place to buy your domain: namecheap.com. I always buy mine there.
Subdomain
As simple as it sounds, a subdomain is a domain that’s part of a larger domain, and it’s used as a way of extending the main domain. For example, recipes.food.com and restaurants.food.com are subdomains of the main domain food.com.
Each subdomain can work as a website independently of the main domain.
You can even install WordPress on a subdomain and not having the main domain working with WordPress at all.
Web Server
Every site needs a place to be hosted, AKA a server. It’s basically a computer, where all your website’s files will be hosted and -therefore- available for the online world.
Hosting Provider
Is a company that provides you with a web server where you can host your site’s files. It’s like a space you rent to store your website in it.
You’ll find a vast amount of hosting companies for WordPress. Some are good, some are less good.
SiteGround makes a good choice for small and medium sized sites. It has a very affordable price, starting at $3.95 / month.
Your site will be fast, they have excellent customer support, and it comes with some cool extra benefits, like an included domain, automatic SSL certificates, and a one-click install for WordPress.
You can check it out here.
Whatever the hosting service you pick, you should make sure it suits these technical requirements: PHP version 7.0 or greater, MySQL version 5.6 or greater, and have cPanel available (for ease of use).
If you’re in doubt, ask the provider before you commit to a plan. And if you’re going with Siteground, you can just go ahead and signup, since they have all of that covered.
Database
WordPress stores and organizes all your site’s information in a database, with your site constantly bringing the needed information from there.
Having a database assigned to your WordPress install is mandatory to run your site and hosting companies for WordPress provide such a functionality.
It’s usually the case that once you setup your WordPress installation you no longer will need to personally interact with the database, unless you need that for specific technical reasons. It’s like you can almost forget about it.
WordPress can work with two types of database software: MySQL and MariaDB.
MySQL
Is the most popular and open source database software that works with WordPress.
HTML
WordPress works with four main code languages: HTML and CSS (declarative languages), and JavaScript and PHP (programming languages).
HTML is a markup language used to structure content in a semantic way. Together with CSS, they give your site a structure and a specific appearance.
CSS
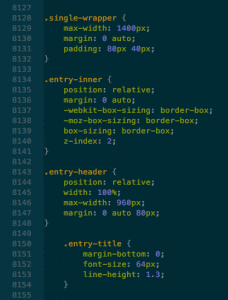
CSS Language
CSS is in charge of giving HTML elements a specific appearance.
It controls formats and layouts. Like setting a font family, font sizes, colors, sizes, positions, backgrounds, and a lot more.
If there’s anything on your site which looks you’re trying to modify, you’re probably in the field of CSS.
Remember we mentioned child themes? Well, for CSS modifications you don’t need to set up a child theme. You can add CSS code right from your WordPress back-end (Appearance » Customize » Additional CSS). Anything you add there will override your theme’s CSS and will stay there even if you update the theme.
Some themes also come with a CSS box that works in the same way as the Customizer Additional CSS.
PHP
PHP is the core coding language of WordPress. Most of WordPress itself and its components (themes and plugins) are written in PHP. Is a programming language that runs on a web server (that is defined as a server-side language).
PHP performs all kind of operations. It’s used to output HTML and to communicate with the database.
JavaScript
Is a client-side programming language (runs on the visitor’s computer). It allows performing all sort of operations on the browser.
cPanel
Is the tool that many hosting companies provide to let you manage server related stuff in your hosting account. It’s a user-friendly interface with access to things such as email accounts, domains, files, databases, and more.
phpMyAdmin
Is a popular and open source interface for managing MySQL or MariaDB databases.
FTP
FTP stands for File Transfer Protocol, a protocol for transferring files to and within your server. You can manage files via FTP on your cPanel, but you can also install an FTP client (a program) on your computer for the same purpose.
Some of the most popular FTP clients are FileZilla and Cyberduck and they’re both free.
You won’t be needing an FTP client if you’re just going to use WordPress for a, let’s call it, small regular site. You will probably install WP through a quick install provided by your hosting company, and upload plugins and themes right from the WP admin area.
If that’s not the case and at some moment you need to transfer files to your website, you’re going to need a way to do that. And unless you want to use the rudimentary and kind-of-slow file manager on your cPanel, you’ll wanna get an FTP client.
SSL
SSL certificates are cryptographic protocols that help to secure communications on your website.
SSL Certificates
When you see a site’s address starting with “https://” it means the site is secured by an SSL certificate.
It’s advisable that you install SSL on your site, for security and trust reasons to begin with, but also for SEO purposes (Google started prioritizing sites with SSL certificates in 2017).
Some hosting providers offer SSL certificates, and you can also get yours for free at Let’s Encrypt.
Localhost
Refers to a server located in your computer. Like a hosting service you provide to yourself, but that only you can access.
To run WordPress you need a database system and PHP. A Localhost app can provide you that, so you can start working on your website without being online and without needing a hosting provider nor a domain.
The most popular localhost apps are Mamp (for Mac) and Xampp (for Windows). They’re both free and pretty easy to use.
Staging Environment
Is an environment where you’ll be crafting your site, that is not where the final website will be.
It’s usually private and only meant for development and preview purposes.
Some web designers even begin work on a development server, where they –pardon the redundancy– develop the site, and only then move to a staging server. The staging server will be an exact version of how the final website will work and look like, just on a different server or installation.
Working on a staging environment will give you the freedom to test anything you want without worrying about messing up the final result, but it’s not mandatory or necessary if you’re website will not be accessed by visitors yet.
Production
When everything in the staging environment is ready, you’ll move the final website to production. That’s the final finished version of your website.
Transient
Transients are temporary small pieces of data stored in the database or memory for faster access. They’re sort of a WordPress-based super-temporary version of a cache system.
SEO
SEO stands for Search Engine Optimization. It involves several strategies and techniques to improve a site’s positioning on search engines results.
Your site’s SEO depends on many factors such as a well-coded theme, good quality content and a bunch of different recommended practices (like getting other websites to link to your own website).
One thing you can do to improve your SEO -without being an SEO expert- is to take advantage of the most popular plugin for SEO: Yoast.
Hooks
Hooks are provided by WordPress or themes to allow you or a plugin to ‘hook into’ a specific place of the code and perform operations.
Multisite
WordPress allows for a special kind of installation called Multisite. Instead of having one site on one install, a multisite allows you to create a network of sites, all in a single WordPress install.
The multisite can work with subdomains, i.e. each site will be on a subdomain like site1.yourdomain.com, or with subdirectories (yourdomain.com/site1).
The Super Admin user will have access to the back-end of the whole network and to each site, while other users may only have access to specific sites.
Each site can use a different theme, plugins and have its own content. They are independent in that matter.
There are many uses for a WordPress multisite. Here are some ideas:
– A network of blogs related to the same company or organization.
– Microsites inside the same big site. Like different departments of a university.
– Different language versions of the same site.
If you want to read further and learn how to install a WordPress multisite, start here.
That’s it.
Are there any other terms that you’d like me to add here?
Let me know in the comments and I will.
Happy WordPressing!
Source: WordPress Codex – https://codex.wordpress.org/Glossary
A lot of web developers use the term “Push” when adding new content to a website. The developer “Pushes” the latest changes made on the stage/local site onto the production website.
Great article!
The most comprehensive and at the same time well explained guide for any WP beginner. It made me understand its functionalities much better, managing now to connect more dots. Thanks a lot for putting all this together!!!
Thanks a lot. Great article – will refer future clients to this so they understand the terms!